7 Steps to Deciphering Old Handwriting for Genealogy Research
August 24, 2022
Picture this…You’ve suddenly come into possession of a box filled with old family pictures and genealogy documents, including a diary written by one of your ancestors over 100 years ago.
Excited to uncover long forgotten family secrets, you open up the diary, only to find that you can barely read the chicken scratch scrawled on its pages. As far as you can tell, the diary is written in English, but the handwriting and spelling looks completely foreign to you.
As frustrating as this may be, it’s far from uncommon.
Now, before you give up and throw the diary— along with the rest of the box— into the corner of your attic for your descendants to find in another 100 years, we have some great tips to help you decipher that difficult handwriting.
Read on to find out more.
Understanding the Standardization of Written Language
Before we dive into tips for reading old handwriting, let’s first try to understand why it’s such a challenge to read in the first place.
You see, prior to the mid- to late-1800s, spelling was not a uniform concept in the United States. People generally spelled things phonetically, according to the way they individually heard the word pronounced. That meant that, depending on where you grew up, there were very different ways you might spell a word.
Take the word pen, for example. If you were born and raised in the Northeast, you would probably write pen as it is officially spelled today. However, if you grew up in the South when pen is pronounced more like “pin,” the way you spelled it would likely reflect that difference.
Frequently, words were also spelled with an extra “e” added at the end, or a “y” used in place of the “i.” For example:
- Do may be spelled doe.
- Cow may be written as cowe.
- Sight may be syte.
- Either may be eyther.
In addition, words were often shortened, and abbreviations were frequently used to save space on paper—and to facilitate quicker writing. For example, William might be written as “Wm” and hospital may be shortened to “hosp.”
Just like spelling, punctuation was also left up to whomever was doing the writing. So, it’s not uncommon to find a document written with commas in strange places, or even with no punctuation at all.
All of this probably sounds incredibly confusing, but don’t worry. There are some tried and true ways to cut through the confusion and learn to read old documents.
Just follow these seven steps, and you’ll be able to transcribe that diary in no time!
7 Tips for Deciphering Old Handwriting
Step 1: Read though the entire document.
It doesn’t matter if 99% of what you are attempting to read looks like chicken scratch; the first step you should always take is to attempt to read through the entire document.
By reading the entire document, as best as you can, you will be amazed by how much you can actually piece together. Sure, there still may be a lot of words you are not sure about. But when you have a big-picture idea of what the document pertains to, it’ll help you to fill in those missing pieces.
Step 2: Look for words you recognize.
As you are reading through the document, take note of the words that you do recognize.

Just as with reading through the entire document, finding words you recognize will help provide context to what the document is about.
This will, in turn, make it easier to figure out the words you don’t recognize.
In addition, keep track of any unusual letter formations.
You may even want to trace those letters or try to duplicate them on a separate piece of paper as a reference. Becoming familiar with letter formations will come in handy when trying to unscramble unknown words.
Step 3: Transcribe known letters in unknown words.
Once you have gone through the document and have picked out the words you recognize, next you will need to find all of the words that you do not recognize.
Next, ask yourself these questions:
- Do those words have any distinguishable letters you can pick out?
- Do they have any letter formations in common with those in the words you recognized?
- Can you tell which letters are capital letters versus lower case?
Use the words you recognize as a guide for how the document’s author wrote certain letters. And if you find yourself particularly stuck on one word, move on to the next. You can always come back and try to fill in missing pieces later.
Step 4: Keep track of misspellings or abbreviations.
As you’re progressively figuring out more and more words, take note of unique ways the author spelled certain words or abbreviations they frequently used. Chances are, if the person who wrote the document used an abbreviation or strange spelling once, they will probably do it again.
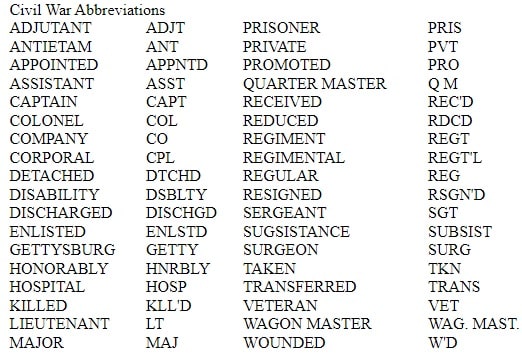
At this point, it also helps to familiarize yourself with common abbreviations or spellings from the time period when the document was written. Here are some good examples of common abbreviations from the Civil War:
Names were another thing that were frequently abbreviated in old documents. Here are some common examples of this practice:
- Abig. for Abigail
- Abm for Abraham
- Benj. for Benjamin
- Cath. for Catherine
- Danl for Daniel
- Edm. for Edmund
- Elnr for Eleanor
- Geo. for George
- Isb. for Isabel
- My for Mary
- Nath. for Nathaniel
- Robt for Robert
- Saml for Samuel
- Wm for William
To find common abbreviations from the time period when your document was written, check for resources within the National Archives website.
Step 5: Use tools to help.
Old documents are often faded and in poor condition, which just adds to the difficulty of deciphering what is written on them.
When possible, take a picture of the document. Or, better yet, use the Adobe Scan App on your phone to scan it and turn it into a pdf.
Once you have an image of the document uploaded to your computer, you can play around with contrasts using photo editing software.
By making the image darker or lighter, it can often make the individual words stand out better, which makes them easier to read.

If scanning the image or taking a picture is not an option (often the case if you are looking at documents in the National Archives or other local archives), a magnifying glass is another helpful tool you can use.
Sometimes documents are written in small print, with words jammed close together. By using a magnifying glass, it can help you determine where each word starts and ends.
Side note: If you do take pictures of the document, please be sure not to use a flash. Camera flashes and bright lights can damage the pigment in the ink, which causes it to fade even further.
Step 6: Take a step back and ask for a second opinion.
We all know how it is. If you stare at any kind of document for too long, it’s easy to miss things such as misspellings or lack of punctuation.
The same goes for old documents.
If you have spent hours trying to decipher a single page (or, even worse, a single word!), take a step back and give your eyes and brain a break.
You may also want to ask for a second opinion. Sometimes a fresh pair of eyes is all you need to break through the proverbial brick wall.
Step 7: Consult a professional genealogist.
There may come a time when deciphering those old documents can feel next to impossible. You’ve tried all of the steps we’ve outline above, and you still can’t read more than a few words.
When all else fails, consider hiring a professional genealogist to help.
Learning to read old documents takes a lot of practice—and that’s exactly what a genealogist can bring to the table. Not only do they have experience with reading these kinds of documents, they also have historical insight into how documents were written during particular time periods.
Ultimately, hiring a professional genealogist can be the key to unlocking the mysteries contained within that old diary.
Final Thoughts
As you venture out on your transcribing journey, there are a few more things to keep in mind.
First of all, be patient with the process and yourself. Nobody has ever said that transcribing old documents is easy.
Also, if you happen to already have a transcription of an old document, be sure to double check its accuracy. Even genealogical sites such as Ancestry have a lot of document transcriptions that are inaccurate. So, it’s always a good idea to read through the document to see if you agree with whomever first transcribed it.