9 Great Holiday Gifts for Genealogy Buffs

With the holidays upon us, you may find yourself searching for the perfect gift for the genealogy buffs in your life.  And while they may tell you that the only thing they really want are the missing census records from 1890,  we’ve come up with a list of some more viable options that are sure to be a hit.

Antique Maps

Photo by Dorothe form PxHere

It is a known fact that genealogists love maps. After all, old maps can tell us a lot about what the world looked like at any given point in time.

With mapsofthepast.com, you can give the genealogy buff on your list an old map of Europe from the 1700s, or even a Civil War map illustrating a specific battle.

Novelty Gifts

They may be a bit hokey, but who doesn’t love a good novelty gift that highlights their favorite hobby?

Amazon.com has a huge collection of genealogy novelty gifts, ranging from t- shirts and keychains to coffee mugs and bumper stickers (which make great stocking stuffers, by the way!).

DNA Test Kits

Image by Arek Socha from Pixabay

DNA tests are all the rage right now. And gifting one to the genealogist in your life may just be the perfect present this holiday season.

Not only will the test results show them where in the world their ancestors came from, but they will also connect them with distant (and sometimes not so distant) relatives whose DNA matches theirs.

While there are many different DNA tests on the market, given their vast databases, the big players such as 23 and Me and Ancestry DNA will give you the biggest bang for your buck.

Magazine Subscriptions

Image by kconcha from Pixabay 

As people who are constantly seeking new and better ways to uncover historical information, chances are that the genealogists on your shopping list are still perfecting their technique and research skills.

Genealogy magazine subscriptions such as Family Tree Magazine or National Genealogical Society Magazine will help your recipient stay on top of the latest developments in genealogy, as well as give them tips and tricks for breaking down brick walls in their research.

Their Personal Life Story

Image by Free-Photos from Pixabay

Genealogists spend hours upon hours researching family history and diving into stories about their ancestors. Chances are, though, that they have never taken the time to write down their own story.

With this one-of-a-kind gift package from The Writers For Hire, your loved one can now preserve their life story to pass on for generations to come.

This beautiful gift includes up to four hours of interviews with your recipient, which will then be turned into a professionally printed, 100% custom hardcover book.

Genealogical Vacation

Image by David Mark from Pixabay

Has the genealogist in your life always dreamed of taking a trip to do research in their ancestral homeland? Or have they always wanted the opportunity to spend hours browsing through records at the National Archives in Washington, D.C. or the Family History Center in Salt Lake City?

Why not make their dreams come true by gifting them a vacation to the destination of their choice?

With sites such as Orbitz and Expedia, you can easily put together a vacation package that won’t break the bank. Or, if you’d rather, check with your preferred airline carrier to see what deals they offer.

Archival Storage

Image by Esa Riutta from Pixabay

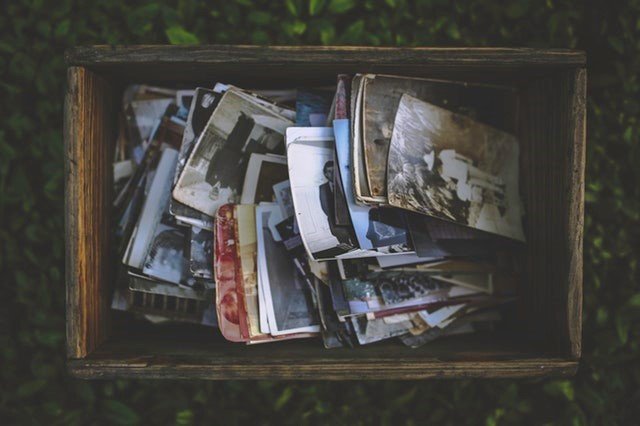
Most genealogists would tell you that one of the biggest challenges they face is storing (and preserving) all of the historical documents they collect.

Not only can documents take up a lot of space (both physical and online), but some of them are quite old and fragile.

Gifting items such as acid-free archival photo sleeves, folders, and storage boxes will go a long way in helping your loved one preserve those valuable records.

Or, if most of their documents live in a folder on the desktop of their computer, consider giving extra USB flash drives or an external hard drive, to ensure that the files never get lost or deleted.

Framed Family Crest or Coat of Arms

Image from House of Names

Is the genealogy buff in your life proud of their Scottish heritage? Or maybe they frequently mention that their great-grandparents immigrated from a small village in Sicily.

Help them honor their family history with a professionally framed coat of arms or family crest.

Jewelry

Jewelry may not be the first thing you think of in your search for unique genealogy gifts. But maybe it should be!

Sites such as Etsy and Zazzle offer a beautiful collection of earrings, bracelets, necklaces, and even cufflinks and watches that the genealogy buffs on your list are sure to love.

What to Include in Your Family History Book

Writing a family history book can be a tremendous gift for your family, especially for future generations.

But it can also be a daunting project. There could be seemingly unlimited amounts of research to dig into. Should you conduct interviews? If yes, then how many should you do?

Just what should you plan on including in your family history book?

First, Determine your Goal for your Family History Book

A family history project can take on many different forms. It could reach far back through many generations, or it could cover a shorter, but significant, period of time.

You may wish to focus on the life of one particular person or provide brief accounts of many.

Pinpointing what you hope to accomplish with your project will help you determine its scope and direction.

If this is your first experience with a family history, you may want to keep the scope of it more limited. You’ll have a better chance of completing the project, and it will help keep you on track.

If your goal is to create a thorough documentation of your family to share with future generations, then you will need to conduct a significant amount of research.

Do you see it as a reference document or more of a narrative account? For the former, you can focus on collecting records of facts. For the latter, you will need supporting materials to add context and stories to round out the presentation of your family’s history.

If you are hoping to create a more visually interesting and engaging type of family history book, here are some suggestions you can explore to help you accomplish this goal.

Bring Your Family History to Life with Personal Anecdotes

Including stories about individuals, and sharing details about their personality and character, is a great way to bring people to life. This is why family history interviews can be so valuable.

You can interview living family members about their own lives or gather stories and memories about relatives who are no longer living,

The more in-depth you can get into an interview, the more rich details you can include in your family history book.

Some family members may prefer to answer questions in writing, and this can be an efficient way to obtain factual information about dates and locations. But in-person interviews are often the best source of stories and memories that come to mind during the back-and-forth of conversation.

These conversations can take many hours, so you will need to gauge how much time and effort you can devote to them. For ideas about what questions to ask, here’s a good resource with a list of suggested questions.

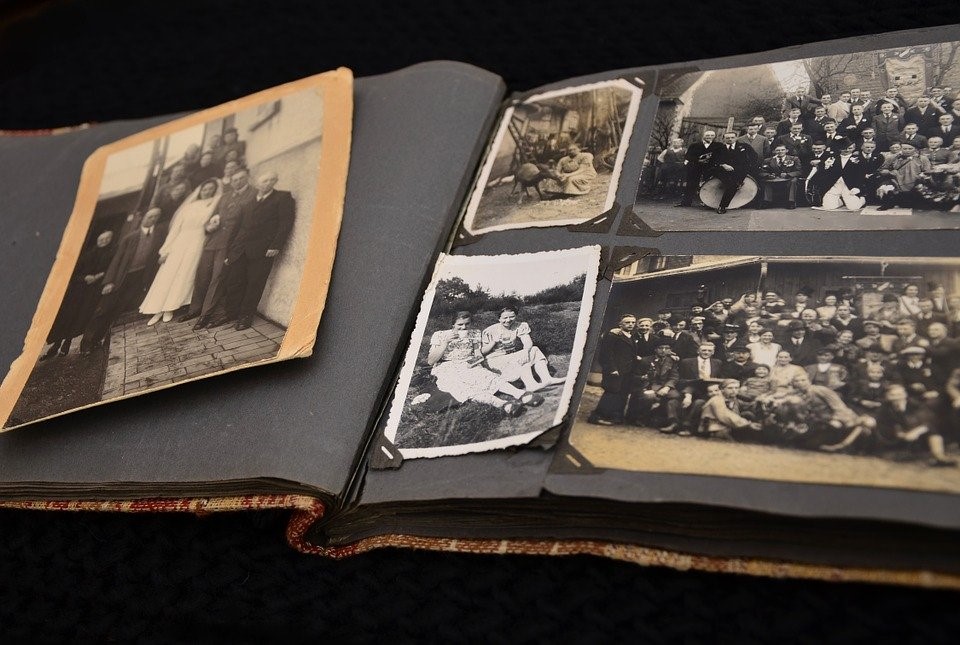
Use Photos and Images for a Richer Experience

Image by Pixabay

Photos of Family Members

The most obvious photos you should try to include are those of family members whose lives are covered in the family history book. If possible, include photos from different stages of the subjects’ lives. These images can tell an interesting story all on their own.

Today, obtaining photos from far-flung family members is easier than ever. You can simply ask them to scan their photos and email you the digital copies of the images. There are a number of ways to scan and digitize photos. You can do it yourself with a scanner at home or even with a smartphone. Or you can make use of a professional service — which will usually give you the best results.

This article from the American Association of Retired Persons (AARP) explains the pros and cons of the different options and provides some suggestions for equipment and services that can help.

Period Photos

The world has changed drastically over the last several decades. Even if no photos exist of your actual family, or where earlier generations lived, you can still provide context by including relevant period photos.

For example, if earlier generations immigrated from a different country 100 years ago, you could find photos depicting that time period. An image of a typical homestead from an early settler could be used to illustrate what it was probably like for your own family members if they were also homesteaders.

Or, if your family originated in a different country, you could include images of what the town or city looked like during the time period when they lived there.

Even if images are not from the same era, they can still provide context if the landmarks are interesting.

One man we worked with recalled how his father used to ice skate on the lakes surrounding the palace where Korean kings used to reside. While we didn’t have an actual photo of his father ice skating, a present-day photo of the palace and its lakes still provided an interesting and relevant visual to support this memory.

Keep in mind you may need to obtain permission to reproduce any images that are not from your personal collection. It’s best to make sure you can legally use an image before proceeding.

Make Use of Interesting Documents

Official documents, such as birth or marriage records, passports, and even school report cards, can provide something visually interesting to support important milestones or even minor ones.

Copies of personal correspondence, or anything written by hand that has special meaning, such as a family recipe, can help bring individuals to life.

To show the historical context, you can include newspaper clippings of any noteworthy news events from the relevant time period.  Maps are also useful for illustrating where people lived and how members of the family moved around.

Another useful graphic that is simple to create is a timeline showing major events in your family’s history. These can easily be created with either word processing or spreadsheet software.

CAPTURE THEIR VOICES, TODAY

Preserve your family history

Liven Up the Narrative with Dialogue

Interspersing your family history with the actual words either written or spoken by family members adds another interesting dimension. The way people speak and write often conveys their personality and can bring them to life on the page.

If you conduct interviews of family members, try to include some exact quotes that add color and convey personality. Not only does this make for more interesting writing, but it also gives readers a glimpse of what the interviewee was actually like.

Pulling excerpts from letters is another way to include exact quotes. If you are fortunate enough to have copies of correspondence, this is a wonderful way to make use of these gems. You can take photos of them and highlight relevant passages as a way to provide both the actual words of a family member and an interesting visual.

Create A Visual Family Tree

Showing your family’s lineage can be complicated and even boring if you rely on lists or straightforward charts.

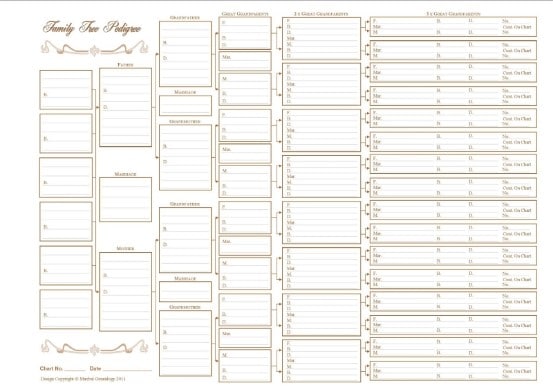
There are many creative ways to illustrate your family tree. Some people like to include photos to represent different family members. Others make use of graphics to make charts more visually interesting.

Much of this decision will depend on how large and how complicated your family tree is. You will need to keep space limitations in mind if you hope to include several branches of your family. Or you can display different parts of your family with their own separate visual graphic.

There are many free templates available to help you design your family tree graphics. Family Tree Magazine has a number of templates that are free to download from their website. There are even simple templates that can be used with Microsoft Word.

Consider Including a Reference Page

When writing a nonfiction book, writers inevitably end up with reams of interesting research that doesn’t make it into the final story. This can be because of space constraints or because they take away from the readability of the book.

When you are creating a family history, you are usually not trying to win the National Book Award. Much of the research you have compiled may actually be worth preserving.

But if you are trying to write a family history narrative that is also readable, cramming every bit of research into the book may not be feasible.

One way you can have both an interesting family history book and share bits of research that don’t make it into the book is to include a reference section. This can include citations for your research so the information can be tracked down, if necessary. It can also contain a section of back matter, which is where you can provide more details or facts about your family history.

Don’t Underestimate the Work Involved

Writing a family history is a wonderful gift to create for your family and will be appreciated for generations to come. But it is a major undertaking, requiring hours of research, organization, and writing.

Keep in mind there are many resources available to help you complete your family history project. With so many different ways to approach the project, you are sure to find one that matches your vision.

How To Make Your Family History Come To Life

You’ve spent the last couple of years researching your family history. You even hired a professional genealogist to track down the information you couldn’t uncover on your own. Now you are ready to share your findings with the rest of your family.  

You could go with a basic family tree diagram, or a journaled scrapbook, but you really want to make the stories of your ancestors come alive in your book.

So, how do you accomplish this? To get started, just follow these steps:

9 Steps to Turning Your Family History Into an Intriguing Nonfiction Story

1. Narrow Your Scope

Depending on how far back your research took you, you could have thousands of people in your family tree. So, who should be included in your book?

The first step to writing your family history book is to decide who and what you want to write about.

Do you want to write your personal family history, with stories about the direct descendants from both your maternal and paternal lines?

Or are you just planning to tell about one side of your family, with historical background facts thrown in?

Are you going to focus on one particular person, like your favorite grandma, and tell the story of how she and her family immigrated to America? Or do you want to tell the entire family history from as far back as possible?

Narrowing down exactly who you want to include in your book, and how much supporting information you want to add, will help you to figure out what to write about.

2. Decide What Style and Tone to Use

As with any good book, it’s important to nail down the style and tone you wish to convey.

Do you want your book to be lighthearted and humorous? Or do you prefer a more serious tone?

Do you want to write in an informal way, as if you are passing stories down for future generations? Or would you rather keep it more formal and academic?

Much like the tone you use when speaking, a writer’s tone is the way in which they say things. Your book could include sad stories about family members who lived through the Holocaust, but your tone might still be uplifting and hopeful.

Style, on the other hand, is the words, syntax, sentence lengths, and structures that you use to support your tone.

Deciding on (and sticking with) a style and tone for your writing is imperative in keeping your readers’ interest.

3. Make an Outline

Image by StockSnap from Pixabay

Before you can actually start writing, you need to first organize your facts and documents into an outline for your book.

An outline is the map you will use to structure your writing. It can be very detailed and include notes about every person and story in each chapter, or it can simply be bullet points showing who and what you plan to write about in each section.

Your outline should also include a plan for how your book will be laid out. If your book is about your entire family tree, you may decide to write it in several parts, with each part corresponding to the separate branches.

Or, if you are just writing about your paternal ancestors, you might want to have each generation represent a separate chapter.

Regardless of what your outline looks like, the important thing is to write one. If you start writing without a good outline, the process will take much longer, and your book will more likely end up being thrown together haphazardly, with important details left out.

4. Conduct Supporting Research

You have the skeleton for what you want to write about, but you will likely need some supplemental information to help make your story more interesting.

It’s not that your five-time great grandparents didn’t live exciting lives, but when you are dealing with the distant past, you’re not likely to have more than a few facts and documents about your ancestors.

To make up for the lack of stories and pictures for those generations, you’ll need to conduct some period research.

For example, if your family history research showed that your ancestors lived in England in the mid-1600s, it might be interesting to include information about the English Civil War.

Or, if your ancestors immigrated to the United States from Germany in the late-1700s, your story would benefit from adding some background information about the Industrial Revolution and how it affected German farmers.

Taking the time to research what was going on in the world when your ancestors lived will not only help you better understand their lives, but it will also add great depth to your book.

5. Interview Family Members

Do you have any living relatives who may have first-hand information, or would have more details about the family stories that you have been told?

If you are lucky enough to still have grandparents who can fill you in on some of the family secrets, it is well worth taking the time to interview them.

While you can gather a great deal of valuable information from just listening to them tell stories, we recommend that you have some questions prepared to help jog their memories and make them think about things that they might not naturally tell you.

We also suggest that you make sure to record your interviews so that you can refer back to them when you are doing your writing.

For some great starter interview questions, check out our guide to family history interviews.

6. Start Writing!

Image by Dariusz Sankowski from Pixabay

Now that you’ve narrowed down exactly what (and who) you want to write about and have decided on how you want your book to be structured, it’s time to start writing.

In general, with family history books it’s best to write in chronological order. You can start with your own personal story and work your way backward, or you can start with your earliest known ancestor and work your way to the present.

Either way, don’t bounce around between generations. That can confuse the reader and cause them to quickly lose interest.

Another way to ensure you keep a captive audience is to add as much detail as possible to your writing.

Nobody wants to read a book full of just names and dates. Incorporating lots of personal stories and background information in your book will make it more interesting and memorable.  

For example, if you have a document that shows that Joe Smith died in 1875, and another document that shows his widow got re-married in 1876, writing “Joe Smith died in December 1875. Sally Smith re-married in August 1876” is a bit dry and boring.

However, adding more details will automatically make the story more intriguing:

“Joe Smith passed away in December 1875 after battling pneumonia during Virginia’s coldest winter on record. Just nine months after his death, his widow, Sally Smith, married a local widower who had four young children of his own.”

When you are writing your book, it’s also advised that you consider documenting your sources.

This is not a requirement, and some people prefer to leave sources out, but it can be helpful to know where the information you found came from. Even if it was just from a story that your great-aunt Betty told you.

7. Have Your Book Edited and Proofread

As tempted as you may be to skip this step, don’t!

Even the most experienced writers benefit from having both an editor and a proofreader look at their work.

An editor will be able to read your book with a fresh set of eyes, make sure it flows well, and let you know if there are any areas that are confusing or missing information.

They will also check for any inconsistencies or conflicting facts in your book.

Then, once your editor has worked their magic, your proofreader will check for spelling mistakes, grammatical errors, or typos, and will ensure that your book is polished and ready to publish.

8. Pack Your Story with Photos and Images

Image by Zoltan Matuska from Pixabay

Do you have pictures from your grandmother’s baby book? Or how about a copy of your great-grandfather’s family portrait? Adding images to your book will help bring life to the people in it.

It’s one thing to tell the story of your grandparents eloping and having their honeymoon at Coney Island. Including pictures of them together on the Cyclone roller coaster will take your book to the next level.

And if you are lacking in old family photos, consider adding images of ship manifests, immigration cards, military draft records, or other documents you came across in your research.

By adding these things to your book, you are not only telling the history of where your family came from but are showing visual evidence that those stories are real.

Another helpful visual to include is a family tree that shows all the people in your book and their relationship to each other and you. This can help your readers keep track of the numerous characters in your family’s history.

9. Publish Your Book!

Because this is a family history book, chances are you are not planning on trying to sell it to the masses. So, attempting to get picked up by a traditional publisher is not something you will be looking to do.

However, you will probably want to have at least one copy of your book printed (even if you are planning on mainly distributing eBooks to your family members).

While publishing can be done on your own through platforms such as Amazon KDP, it does pay to hire an independent publishing company, if you can afford it.

Not only will an independent publisher help you with the process itself, they can also assist with formatting and adding visuals so that your final published product is the best it can be.

If you are unsure what publishing route is best for you, check out this great blog on choosing a publisher for your family history book.

The Ins and Outs of a Nonfiction Ghostwriting Contract

Have you dreamed of seeing a book with your name on it?

Would having a book published under your name help get your speaking engagements or enhance your personal brand? Do you have something important to say but don’t consider yourself a writer? Do you want a record of your family history? Are you considering running for office?

If so, you may have wondered about hiring a ghostwriter.

A ghostwriter is someone who will create content for you that can be published under your name. A ghostwriter can pen anything from the shortest of blog posts to an article for a magazine or a series of books.

Hiring a ghostwriter isn’t complicated, but the question of “what goes in the contract” can be a little daunting.

Just like in any other industry, the contract will be a written record that clarifies objectives and practical matters from the beginning to make sure you get the result you want.

Your contract doesn’t have to be overly complicated, but it does need to clearly set out your expectations, as well as include clauses for termination, payment, and ownership transference.

That’s because having a book ghostwritten for you is like having a home built. Just like a home, your book is a work made for hire, according to your instructions. And just like when building a home, you need to make the most critical decisions before you get your contractors started.

It would be no fun thinking you were going to get a beach bungalow for large family reunions and ending up with a cozy one-bedroom designed for secluded, romantic weekends for two.

So, What Kinds of Things Should Be Included in the Contract for a Ghostwritten Book?

Final Deliverable

The final deliverable is what you are paying for.

The final deliverable is a manuscript.

It is “the content” that can be published under your name.

A ghostwriting contract typically doesn’t include a cover design or interior design or specific formatting for an e-book or print production.

However, many ghostwriters have connections to publishing and design firms that can help with these services.

This is something that should be addressed when discussing the final deliverable.

In the contract’s deliverables section, you’ll want to include a rough description of the book.

The description can include a working title and the genre of your book, for example, “The History of Arctic Oil Exploration.  A collection of nonfiction essays, each essay being the biography of a person of historical significance.”

Your deliverable should also indicate your book’s length.

How long should your book be? Well, it depends on what you want it to accomplish.

Is it a technical manual or textbook of sorts, to establish your authority?

Is it a romance novel as a gift for your beloved?

Is it a self-help book with a number of pages for readers to fill in answers to exercises?

Is it a memoir of a short period in your life or a longer one?

Once the purpose of the book is established, your ghostwriter can advise you on the appropriate length.

In the contract, the length of a book should be stated as a range of words, along with a rough page estimate for clarity.

For example, 20,000 to 30,000 words is about 100 pages.

Finally, whether or not you choose to explicitly state them in the contract, it’s critical to set realistic goals for your manuscript.

As Dr. Angela Lauria, CEO of The Author Incubator says:

I spent 17 years as a ghostwriter and every single book I was hired to write got done. But what I noticed was that very few were happy with the result the book got them. They told me they wanted a book and I believed them. Writing a book has always been easy for me. But I wanted my clients to be happier. That's when I realized the book was actually supposed to be a path to get them something else. They didn't just want a book on the shelf they wanted the book to create something for them.-Dr. Angela Lauria

So, your first task is to get crystal clear on what you want your book to do for you.

Dan Gerstein, founder of Gotham Ghostwriters notes two common goals:

  1. Your book could position you as a thought leader in business, tech, advocacy, or politics. In this case, your book will serve as the foundation for your authority and help you to secure speaking engagements or sell your services. In some cases the book can be leveraged into workshops and seminars and webinars.
  2. Your book tells a story – a cautionary tale or an inspirational tale to help others. This would include memoir and self-help books.

Remember that book sales rarely make an author wealthy.

You shouldn’t expect to recoup the money you spend on a ghostwriter via book sales.

So, if increased income is the goal, it’s up to you to set goals that will allow you to leverage your book for speaking engagements, or c-suite job offers, or the like.

Services

This part of the contract gets into the nitty gritty.

You may think that the services provided by a ghostwriter would be fairly straightforward.

They write … right?

Yes, but they may (or may not) also proofread, edit, organize, research, and assist with publication of your manuscript.

Expecting your book to be proofread is standard, as are a couple of rounds of edits.

It is also standard that a ghostwriter will fact check easily verifiable claims throughout the book, to ensure accuracy.

A professional ghostwriter with editorial strategy experience will also be able to collaborate with you on determining the “hook for the book” and creating a book outline.

Expect to invest a minimum of 10 to 20 hours of talking time at the beginning of the process to help your ghostwriter to understand your voice and create a structure for your book.

Although proofreading, editing, and organizing may be considered standard, you should still outline these services in the contract to minimize any areas where your expectations could be misaligned.

Then you get to research.

Research is one of the most unpredictable elements of a project so clearly outlined responsibilities on your part and the part of your ghostwriter is crucial.

The subject of the research and the expected amount (in hours) should be specified.

For example, “no more than 30 hours of research total” or “20 hours of research on great white sharks by November 30.”

This way, everyone knows when the work is going beyond the scope of what has been agreed and you can adjust timelines and payments accordingly.

Do interviews need to be done?

If so, you should specify with whom and by when.

If that’s not possible, then you can specify how many hours your ghostwriter will spend tracking down industry experts or celebrities.

In almost all cases, your ghostwriter will also need to interview you.

You should set a number of hours of expected interview time, as well as outline travel expectations and expenses.

Will the ghostwriter need to travel to your home or office?

If so, the number of expected in-person visits should be included, as well as listing of any reimbursable expenses, such as gas or airfare.

Ideally, your ghostwriter should be able to advise you as to how your book might best fit into the market and suggest publishing options.

If you have decided that you will target a traditional publisher rather than self-publish, you may want help with pitching the book to them, and that service can be included in the contract, too.

Your ghostwriter or ghostwriting firm may have helped pitch your book to publishers, but a guarantee that the book will be published will almost never be included in a contract.

Now, one person may not be able to fulfill all these services, so you may want to engage a ghostwriting firm.

Firms can often also assist you with ancillary services such as design, a book website, ebook publishing, and book launch press releases.

Choosing a firm can also help you feel at ease that even sickness or death won’t get in the way of your book getting finished!

Ownership

The ownership of the work transfers to you completely and the contract should be crystal clear on that point.

You should have full authority to claim you are the author of the book and may take full credit for it.

Since you are the owner, you will have all rights to the work, including film and audio rights, domestic and foreign.

You should see something like the following in the contract, “All rights, title and interest in the following shall be the sole and exclusive property of Author, including:

(i) All materials, including but not limited to Word files, PowerPoint presentations, tapes, completed manuscript, the completed project and/or other product resulting from this effort;

(ii) The content of the subject matter of the book provided by the author;

(iii) Any ideas, works, documentation or notes conceived related to the book;

(iv) All writings by ghostwriter related to or associated with the book; and

(v) All ghostwriter’s work product related to the Book.”

You may also see something that specifies that you won’t be provided full ownership until the amount agreed upon has been paid to the writer in full.

Confidentiality

You can decide that the ghostwriter’s authorship can never be made public or you can choose to put the writer’s name as a byline on the finished product along with yours.

This fact should be specified in the contract, for example, “the ghostwriter will keep their role in the project confidential. The author is the owner of the manuscript and holds the right to choose the manner and time of disclosure. Permission for the ghostwriter to discuss the project must be given in writing by the author.”

Per your discretion, the ghostwriter could be allowed to provide excerpts of the work they did to potential clients.

Before they do so, that potential client should sign a non-disclosure agreement (referred to as an NDA).

The contract should also specify that you should be told when an excerpt of the work is used in a portfolio.

This protects your position as author of the work.

Protection

There are certain legal protections that you will want to be sure are included in the contract.

In fact, these protections will go both ways.

It’s called “mirror indemnification.”

These clauses in the contract will say that the writer (your ghostwriter or firm) is responsible for anything illegal that they do and you (the author) bear no responsibility for it. And vice versa.

You should be indemnified against any claims and expenses arising from infringement of any copyright or violation of any property rights that may appear in the work.

Likewise, your ghostwriter should be protected from anything scandalous or libelous that you choose to include under your name.

Ghostwriters should warrant that their work “does not infringe any copyright, violate any property rights.”

You should “defend, indemnify, and hold harmless” the other against “claims, suits, costs, damages, and expenses that may be sustained by reason of any scandalous, libelous, or unlawful matter contained or alleged to be contained in the work.”

If you aren’t sure if your content will be considered libelous, consult with an attorney.

Remember that your ghostwriter is not an attorney.

Dan Gerstein notes that this kind of protection was crucial in one particular project that was about a very high-profile controversy where the author was involved in legal issue with the federal government.

Work Schedule

Do you like face-to-face meetings during which you can bounce ideas around with everyone else and leave with a plan of action?

Perhaps your schedule doesn’t allow for that style of working or you find it preferable to receive work from your ghostwriter to look over, take time to consider, and deliver written feedback.

You can discuss with your ghostwriter how you would like the working relationship to be set up and your ghostwriter can sketch out a work plan.

You might include the milestones (with target deadlines expressed as a date range) you agree upon with your ghostwriter.

If you are sure of your desired end date, you can then think backwards with your ghostwriter to agree upon the due dates of the various elements leading up to the finished product (like the first outline and the first draft) to make sure your book is completed by the time you need it.

You could include this work plan in the contract, or it may be something that is less formal but still provides everyone with a comforting structure.

Final Deadline

The expected end date could be a crucial piece of information.

Do you have an event at which you’d like to distribute your finished book, for example? The contract can lay out what happens if things get delayed due to the ghostwriter’s actions.

You might include a clause that sets out a specific amount to be paid to you for each day that expires after the prescribed final deadline.

But remember, the ghostwriter is also entitled to expect you to meet your deadlines.

If you are somehow responsible for preventing the work from being completed, for example by withholding required information or not showing up to a meeting, then your ghostwriter is not responsible for the delay and is still entitled to be paid for the work done up to that point.

Pricing

When negotiating a price, bear in mind that the final fee should take into account all time spent on the project (for example, primary research and interviews), and not just on writing alone.

The contract should indicate the amount the ghostwriter will be paid for their work, when they will receive payment, and how they will be paid.

You can arrange payment in a number of ways.

It’s possible that part of the payment could be paid in the form of royalties (in exchange for a lower upfront fee, the author may share some of the advance and royalties with the ghostwriter).

But that is very rare.

Many ghostwriters will ask for 50% of their fee up front and take the remainder upon completion.

But it is also common for the fee to be paid in installments at the agreed upon milestones, or monthly based on the amount of time spent by the ghostwriter.

Disputes

No matter how carefully one prepares, life still happens, and you may find yourself at odds with your writer.

So, the contract should lay out how disagreements and disputes will be handled.

It’s usually sufficient to include a paragraph stating that any dispute, if it cannot be solved by good faith negotiation between the parties shall be submitted to binding and confidential arbitration under the rules of the American Arbitration Association in a particular state, as follows:

“Any dispute arising from this Agreement shall be submitted to binding and confidential arbitration under the rules of the American Arbitration Association in the state of [state] and county of [county], and any award issued in such arbitration may be entered and enforced as a judgment in any court of competent jurisdiction. The prevailing party in any such arbitration shall be entitled to recover attorneys’ fees and costs.”

If your ghostwriter happens to be working in a different state from where you live or do business, you have a choice of states and you may want to consult an attorney to get advice on which state to go with.

Escape Clauses

A complete ghostwriting contract should include an escape clause that works both ways.

Sometimes, it is best to terminate a project when things aren’t working out and cannot seem to be remedied or re-scoped.

An escape clause should include a predetermined “kill fee” paid to the ghostwriter.

This means that the ghostwriter be fairly compensated for services rendered, even if you are unsatisfied with the results.

The Bottom Line

Your ghostwriting contract sets basic parameters, so you know what to expect for your money.

At the same time, writing a book is a creative process.

It is a collaborative process, so don’t hesitate to be honest about what you want the book to do for you and to nurture your relationship with your ghostwriter.

Disclaimer: (Nothing that appears in this article is intended to serve as legal advice; for that you should contact a duly accredited attorney.)
Publishing Your Private Memoir or Family History Book

You have a story to tell, and you are confident that it’s worth telling. It has characters, drama, and is filled with emotion. The best part is, it’s all true!

Now you want to preserve that story for those you love and generations to come. 

So, what do you do once you’ve finished putting words on the page? You want to publish your story in a tangible book form, but you aren’t looking to sell it for money. This book is for friends and family only. 

How do you choose a publisher for a private memoir or family history book if you only need a few copies?

We spoke with Nancy Barnes, author of Stories To Tell: an easy guide to self-publishing family history books & memoirs and founder of Stories To Tell: Self-Publishing for Independent Authors. She helped us discover the essentials you need to know to find the right publisher for your book.

Private Memoir vs. Family History

Step one to finding the right publisher is to understand what kind of book you are writing. Is it a private memoir, or is it a family history book? Here’s the difference:

Private Memoir – A private memoir is written from your point of view and may only include specific periods of time from your life. It can be anecdotal and may have a unifying theme throughout. 

Family History – A family history book is just that. It’s a report of family history that includes as much detail as possible, including a family tree, photos, documents, letters, and other ephemera. It might even include stories that have been passed down from generation to generation.

Understanding what kind of book you are writing can help you grasp what support you will need from a publisher and how much you want to do on your own.

A family history book with a lot of documents can be very time consuming and may warrant paying a little extra to have professional help to put it all together. A memoir, on the other hand, might be something that you can tackle mostly on your own.

Publisher vs. Self-Publishing vs. Independent Publisher

The next thing you need to know, before you open up Google and start searching, is that “publisher” isn’t exactly the right term for what you need. What you want to search for is an “independent” or “hybrid” publisher. But, what’s the difference? It breaks down like this:

Traditional Publishing

Getting your book published by a traditional publisher involves querying publishers, or more likely, agents who will try to get your book picked up by a publisher. This leads to a long period of waiting and rejections. But books do get picked up by publishers, so it can be worth the wait if you’re looking to sell your book rather than creating a keepsake for family.

When a publisher purchases the rights to your book, you will get an advance and a percentage of all sales. The publisher takes over the publishing, marketing, distribution, and pricing.

The intent is to sell a lot of books and make a big profit, and the publisher is willing to pay you for the opportunity to do it.

There’s nothing wrong with that, if selling your book is your goal. But it’s not what you should be looking for if you’re just hoping to have a few copies to give as gifts to your family.

“Unfortunately, family histories and memoirs are not big sellers, so publishers won’t even look at them. If you’ve written a family history or if you’ve written a memoir, you’re looking at a self-publishing company, which is a different thing. And then, amongst them, there are different models as well,” says Barnes.

Self-Publishing

Self-publishing is the act of publishing a book without the help of a publishing company. In other words, you are doing it all by yourself.

This process can generally be done completely online, through a self-publishing platform such as Amazon KDP or Barnes and Noble Press.

The upside to this route is that you don’t have to wait to find a publisher that wants your book. You simply pay to play. The downside is that you’re on your own. It’s up to you to make sure that your book is error-free and professional-looking.

Independent Publishing Company/Hybrid Publisher

Simply put, an independent publisher or hybrid publisher is a publishing company that is not affiliated with any large conglomerate or cooperation. These publishers, who are sometimes also referred to as “author service companies,” focus more on the services they provide to you than on selling the finished product.

Acting as a cross between a traditional publisher and a self-publishing platform, these publishing companies allow the author to pay for only the help that they need.

Since there’s no reason to expect to sell a lot of copies of your private memoir or family history book, there’s no need to pay a publisher for services, such as marketing, that you won’t need. With independent self-publishing, you simply pay for what you need to create your book. 

According to Barnes, “It can all be done without a publisher. That’s what self-publishing is. But the term that we use is independent self-publishing, which means you keep all the rights, and nobody is making a profit off your book other than you.”

4 Steps to Publishing Your Book 

Okay, so you’ve finished your book and are ready for an independent publisher to help you get it into print. Congratulations! Now what?

Before your book is ready for that final printing stage, there are four essential steps you need to go through:

Step 1: Editing

Even Stephen King and J.K. Rowling’s books go through editing. Why? Because authors are human. No matter how good a writer you are, you will make a few typing mistakes or leave out information that your readers want. And, when you edit your own work, you’ll tend to read what you think you wrote, not what’s actually on the page.

Put on your thick skin and be open to suggestions. In the end, editing makes your book better.

There are three phases to the editing process:

  1. Peer Edit – Find a friend or relative who has a good grasp of the English language to give your manuscript a once-over. Ask them to look for anything that comes across as confusing or vague. Take all of their suggestions to heart, though you should only make changes that make sense to you. This phase will likely discover some basic typos and grammatical errors, too.
  2. Professional Editing – Now it’s time to bring in a pro. A professional editor will look over your manuscript to analyze the flow of the story. Does it make sense? Are there gaps and unanswered questions? This phase helps to make your book the best it can be.
  3. Proofreading – This is what most people think of when it comes to editing. Proofreading is a final line-by-line, word-by-word reading that will weed out any remaining typos, grammatical errors, or other basic mistakes. It’s the polish on your finished work.

An independent publisher can help you find the editor or editors you need, or you can do this on your own. Just remember, at some point, you will want to hire a professional editing team to make your book amazing and error-free. It’s money well-spent.

Step 2: Design

Design encompasses everything from the layout of the text and photos to creating a cover for your book.

While you may have a photo or image in mind for your cover, you still want to have a professional do your design.

Your independent publishing company should have several designers from which you can choose. 

Step 3: Printing

Your book is ready to hit the presses!

Some independent publishing companies have a specific printing company that they work with and will include the printing in your costs.

Others may shop around to find the best price for the quality printing you want, and let you pay the printer directly.

Either way, your independent publishing company should help you determine exactly what you want your final product to look like, and what kind of printing you need to get it there.

“Many people want beautiful books for their families. So, a lot of them will do two versions of the book. One of them is the beautiful, heirloom book that will last for years, the hardcover. And sometimes, because of money, a softcover version that they can buy and distribute. Or they can put it up on Amazon for family and friends to buy for themselves,” says Barnes.

Step 4: Distribution 

Distribution for a private memoir or family history book is minimal.

That being said, your independent publishing company should handle it for you once you know all of your options. 

“Distribution can be Amazon, or it can be having it with the printer and then drop-shipping it to friends or relatives,” says Barnes. “But it still needs to be figured out. Most people at the very beginning think ‘I only need 20 copies,’ and they haven’t thought that through because you usually have another 20 people waiting behind those 20,” says Barnes.

Finding a Good Independent Book Publisher

As you search for an independent/hybrid book publisher that can be your partner in making your book become a reality, there are some basic things you should keep in mind.

First of all, they should be able and willing to help you through the four steps listed above. In addition, there are some other things to keep in mind:

Own that ISBN.

This is essential. You should have your ISBN in your own name.

If your publisher assigns it to you or offers it for free, it usually means that they have ownership of your title and you’re trapped with that company. And once a book is registered to a specific publisher (and not to you), you can never move it to a different publisher.

An independent publishing company should be able to help you purchase an ISBN in your name.

Don’t pay a markup for printing.  

An independent publishing company should help you get your book ready for publication and help you find a good printer, but it should not make money on the printing itself or any sales thereafter.

Don’t pay for what you don’t need.

“Beware all-in-one packaging,” says Barnes, “because they often are just charging more for services which you will never utilize. Buying a la carte is smart.”

You want to know what each step should cost so you can understand what you are paying for as you go.

Ask how you can save money.

Are you able to photoshop your own pictures? Do you have a friend who is an editor?

A good independent publisher shouldn’t be afraid to help you save money on the process if you ask. The goal is a great finished product, and a happy author, not a big sale.

How Much Will I Pay to Publish My Book?

According to Barnes, you should expect to pay between $1,500 – $3,000 to an independent publishing company. That does not include the printing itself or copies of your book.

A larger book, a book with many pictures or documents, or multiple rounds of editing can raise the price. Otherwise, if you’re paying more than this, you’re probably paying for something you don’t need.

The best way to avoid getting ripped off is to understand how much each step should cost so you know that you’re not overpaying. Ask for itemized estimates for anything you’re expected to pay for during the process.

When it comes to printing, consider how many copies you will need and what quality you want. Then, try to match that with a price point with which you can live. Your independent publishing company can help you find printing options that will fit your project and your budget.

A Good Independent Publisher Should Be a Trusted Partner

The good news is that independent and hybrid publishers are abundant. There’s a good chance that you can find one that will take on your project and help you make your book a printed, polished reality.

The best ones will work with you every step of the way and make sure that your book is coming out just how you want it to be.

As Barnes says, “It’s a deeply personal sharing with the people they love. Memoirs are more reflective, and they’re thinking ahead to the future. It’s a really strong act of gifting the next generation. Family history can be an even bigger gift. These books are a reflection of a tremendous amount of information gathering. They can be very valuable even to two generations down the road when they may not have access to the sources that the author will have.” 

Your book is a gift for generations to come. It pays to find the right independent publishing company to help you make it amazing.

7 Steps to Researching Your Family History Online

I have this fantasy of taking an extended trip around the world to discover where my ancestors came from and to meet long-lost relatives.

In this fantasy world, I have unlimited time and resources to explore every rabbit hole and track down clues about those who came before me.

The reality is that I—along with most people—don’t have the time it would take for such a great quest. But that doesn’t mean we have to give up our pursuit altogether.

In fact, with all of the incredible ancestry resources available online, it is now easier than ever to research your family history and solve the puzzle of who you are and where you came from.

To get started on your family history journey, just follow these 7 steps:

1. Get Organized

Before jumping into your research full force, you’ll want to take a minute to get organized.

Depending on how far back you are hoping to take your family tree, you could be dealing with hundreds to thousands of different people and documents.

Whether it be folders and sub-folders on your computer desktop, or physical folders in a file cabinet, coming up with an organizational system will help you keep all of the information—and people—you find straight.

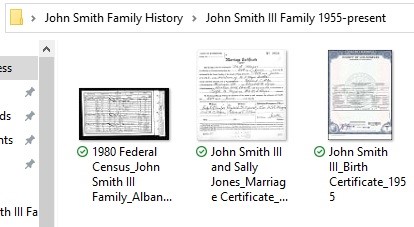
Once you’ve decided on a filing system, you will need to come up with a file naming system to identify each document you are saving in the folders. For digital files, this could be something as simple as a person’s name, the document type, and the date (John Smith III_BirthCertificate_1955).

In the screenshots below, you will see an example of my preferred method of organization. For each branch of the family I am researching, I have a master folder with sub-folders for each generation.

Then, inside the sub-folders, I keep all of the documents that I find for each person in that generation.

If I happen to have physical documents, I simply take a picture of the document and upload it into the correct sub-folder on my desktop (with a note to remind myself that I have the physical document in my possession).

Ultimately, though, it doesn’t matter how you choose to organize your information. What matters most is that you find a system that works for you, and that you stick with it.

I promise you’ll thank yourself for this in the end!

2. Determine What You Want to Research

Doing research is pointless if you don’t know what it is you are looking for. To determine exactly what you want to research, start by asking yourself the following questions:

How far back do you want to go?

  • Are you just hoping to find information about your great-grandparents who immigrated from Europe? Or do you want to go back as many generations as you can?

What branch of your tree are you going to focus on?

  • Do you want to just trace your father’s paternal line? Or is your goal to end up with a comprehensive family tree for both your maternal and paternal lines?

How much information do you want to know about each person in your tree?

  • Do you want just the basics, such as places and dates of birth and death? Or would you like to try to dig up actual stories about their lives?

Once you have narrowed down your research goals, make note of them so that you can reference them when needed. These goals may change as you progress with your research, but they will be a good place to start.

3. Choose a Family Tree

Building a family tree is a great way to keep track of all of the data you find in your research. It is also helpful to be able to see a visual representation of your family members, and their relationship to you.

Online genealogy sites such as FamilySearch.org and Ancestry.com have fantastic family tree capabilities which allow you to input the demographics of yourself, your close relatives, and your ancestors. And the best part is, the family tree templates are free!

Make sure to do your research to find the site that best fits your needs, though. While some of the sites, like FamilySearch.org, offer free access to their family tree templates and research database, they don’t necessarily allow you to store much more than names and dates of birth and/or death.

Ancestry.com, on the other hand, allows you to build a much more extensive family tree for free, but reviewing any of the helpful hints and research database will cost you between $24.99-$44.99/month.

Or, if an online family tree template does not appeal to you, you can always go with the old-fashioned printed version, and pencil in information as you uncover it.

FamilyTreeTemplates.net has a great collection of free templates that you can print and fill in yourself.

4. Choose an Online Research Database

From Ancestry.com and FamilySearch.org to Archives.gov and MyHeritage.com, there is an endless plethora of online databases for genealogical research. The trick is finding the ones that are right for you.

Depending on how much you are willing and able to invest in your research, paying for access to a site like Ancestry may be worth the money. There are plenty of other good sites, though, that won’t break the bank.

Here are some of the best genealogy databases available online:

Ancestry.com

Ancestry is a subscription-based service with a huge database of over 6 billion records worldwide. A subscription to this database will cost you between $24.99-$44.99/month, depending on your level of access, but you can save money if you sign up and pay for their 6-month subscription.

In addition, if you sign up for their “all access” membership, you will also get access to newspapers.com and fold3.com (as well as Ancestry’s entire international database).

If you are interested in accessing Ancestry’s impressive database, but don’t want to pay, check your local library. Many libraries have a subscription to the site that they allow members to use for free.

Archives.gov

Archives is the federal government’s comprehensive database, which includes U.S. military records, immigration records, naturalization records, land title records, census records, and more.

While research on Archives is free, the site is not as intuitive as some of the other databases, so finding the information you need can take a while. 

Once you do locate your ancestor’s records, you can export each of the documents and save them to either your online family tree, or to the files on your desktop.

Ellisisland.org

If your ancestors immigrated through Ellis Island, you are sure to find some great information on this site!

The site, which provides information for every ship that entered the Port of New York between 1892 and 1924, allows access to manifests that show the passengers’ last place of residence, age, occupation, and marital status.

The manifests also include names of family members who were already residing in the United States.

FamilySearch.org

This extensive site is the official online database of the Church of Jesus Christ of Latter-day Saints. It includes an exhaustive collection of records from around the world, including census records, birth and death certificates, marriage records, baptismal records, and more.

Documents found on the site can be downloaded and saved to the folders on your desktop. You also have the option to attach them to your family tree.

Access to this incredible database is free of charge once you sign up for an account.

Fold3.com

Sponsored by Ancestry.com, this subscription site provides access to over 576 million original documents, including military records and pensions, orphan records, Confederate papers, WWII records, census records, and more.

While searching their database is free, a membership subscription is required to be able to actually view their collection. Memberships start at $7.95/month but are free with the Ancestry “all access” membership.

Findagrave.com

This fantastic online repository includes more than 60 million grave records, 190 million memorials, and millions of photos.

Searching their database is easy and free, but to add a memorial or grave listing you must register for their free membership.

MyHeritage.com

Like Ancestry.com, MyHeritage.com is a subscription-based site that offers a free basic family tree feature. In order to access their research database, though, you must pay between $10.75-$24.92/month (depending on your level of access).

While MyHeritage is not as expensive as Ancestry, their database is also not as large, and their site does not include as many bells and whistles.

It is still a decent site for genealogy research, though, and their free family tree template is more robust than the one offered by FamilySearch.org.

JewishGen.org

For people with Jewish ancestry, this wonderful site provides access to millions of records, including Jewish Communities Database, Yizkor Book translations, and first-hand accounts and context about Jewish communal and familial life throughout the world.

Basic access to JewishGen’s database is free (although they do suggest you make a donation if you are able to), but you must first register for an account before you can start your search.

5. Start Your Research

You’ve developed an organizational strategy, zeroed in on what you want to research, started a family tree, and registered for an online research database (or two!). Now what?

It’s time to finally start your research!

If you are planning to research your entire family tree, it’s best to start with one branch at a time. Jumping back and forth can be extremely confusing and can cause you to lose focus.

Once you have decided while branch to start with, follow these tips to get your research underway:

Start with what you know.

The best way to find the answers to what you don’t know is to start with what you DO know. After all, your history begins with you.

Fill in your family tree with your full name, date and place of birth, and any other pertinent information about yourself. Then do the same for all of your direct relatives.

If you are not sure where your mom was born, or what your dad’s middle name is, that’s okay. You can fill in all of that information later. Just start out with the things you are already sure of.

Then, once you have entered everything you already know, you will be able to see the areas where you are missing information.

Work your way from the present back.

You’ve already entered all of your information on your family tree, so it’s time to jump to the next generation.

Was your father in the army? Try searching for his military records. Did your mom graduate from a prestigious university? Search for her old yearbooks and school records.

Once you have found enough information about your parents, move on to your grandparents, and so on.

Focus on family stories.

Chances are, your family has at least a few stories that have been passed down from generation to generation.

While those stories may have changed over the years, they are probably based in real events that happened. Use the narratives that you’ve been told as clues to uncover facts about your ancestors.

Do you remember being told as a child about your immigrant grandparents struggling with life in New York? Check out Ellis Island immigration records to find out when they arrived and where they came from.

Did your grandmother pass on recipes from her mother in Germany? Search ship manifests from Germany to find out when your grandmother immigrated.

Search through census records.

U.S. federal census records are probably the most underrated and underused tool for family history research.

Not only do census records help determine the number of seats that a state has in the U.S. House of Representatives, and decide federal funding for your community, they also happen to contain a wealth of information that is invaluable to your family history research.

Ever since the establishment of the Federal Population Census in 1790, the census has been taken every 10 years. And viewing the census records is as easy as typing “census records” into pretty much any search engine (including your genealogy research database).

Once you locate the census record you need, it can provide you with an abundance of information, including:

  • The location of the household
  • Name of the head of the household
  • Names of all people residing in the home, and their relationship to the head
  • Race, gender, age, birthplace, occupation, education level, marital status, and language of all members of the home
  • Parents’ names and birthplaces

While mistakes can frequently be found on census records, the information they provide can give you valuable clues needed for your research.

Think (and look) outside the box.

While researching your family history, you are bound to hit a few brick walls. It is just an inevitable part of genealogical research.

When do you hit those brick walls, though, don’t give up!

There are ways to get around them and find the information you are looking for. You just have to get creative and think outside the box.

If you know your ancestors lived in Kentucky in 1920, but can’t find them on the census records, try searching with different spellings of their names. Names on old records were recorded in whichever way the person writing saw fit. So, your great-aunt Concetta Mazzarino may be found under the spelling Concheta Motsarino.

Or, if you can’t find your great-grandmother’s place of birth, try looking at her children’s birth certificates to find the answer.

And, if all else fails, just move on to the next person in your tree. You can always come back and fill in the blanks later on.

Double check your facts.

Sites like Ancestry and MyHeritage are wonderful resources for family history research. Their search features allow you to quickly find relatives on immigration records, and to connect to other people who share relatives in common.

What they are not great for is providing information that is 100% accurate.

Part of what makes genealogy sites so helpful is the fact that the general public can upload information and documents directly to the site. This also means, though, that the “facts” you find on these sites may not actually be factual.

For this reason, it’s important that you double check the information you find, to make sure that it is correct and that it belongs to your ancestor (and not just some person who happens to share the same name).

6. Take a DNA Test

With the ever-growing popularity of DNA tests like 23 and Me, and Ancestry DNA, you may be wondering if, and how, they can help with your family history research.

While there are a lot of DNA tests available on the market right now, they are not all created equal.

Both 23 and Me and Ancestry DNA are well rated and have extensive databases of DNA from around the world. Because of this, your chances of finding DNA matches are much higher than with the other tests available.

That being said, if you are not ready to fork out $100 to have your DNA tested, less expensive tests like Family Tree DNA and My Heritage can still be helpful.

So, how do they work?

For each of the tests listed above, scientists use your DNA—which you submit through a saliva sample—to isolate your cells and analyze your genes. They then compare the alleles from your genes with the alleles in their databases.

When your DNA shows similarities to certain locations, you get a report outlining the locations where you had DNA matches.

Those matches are where your ancestors came from.

(Note: the actual scientific process is much more complicated than my simplified explanation. There is a reason I am a writer and not a scientist, though)

How can that help with my family history research?

Once you receive your DNA results, there are several ways they can help with your family history research.

Through the DNA matches, you can connect with distant biological family members, who may be able to share information they have about your family’s history.

The results can also give you an idea of where your ancestors came from, and how long ago they lived in a specific area. This information can help you to zero in on the areas where you should focus your research.

7. Find Professional Help

At some point in your research, you may find that you simply cannot break past the brick walls to find the answers you are looking for.

Genealogical research can be tricky and very time consuming, and although there are more and more resources available every day, some things just can’t be found through an online search.

If you have taken your research as far as you can on your own, you may want to consider hiring a professional genealogist to solve your unanswered questions.

A professional genealogist will be able to finish the research that you started and use their knowledge and resources to tie up loose ends.

And, once they are done, they can even help you find a way to present your family history so that it can be passed down for generations to come.  

How To Write a Family History Book—7 Steps Plus A Pro Tip

With the rise in popularity of media programming such as PBS’s Finding Your Roots, and the ease and accessibility of home ancestry and DNA test kits, more and more people are choosing to research their family history.

The internet has made this research easier than ever before.

For those who decide to go even further—to compile and record the facts and stories they find—it has also brought along tools for writing and publishing a family history book that can be shared and passed down for generations.

The idea of such a complex and time-intensive project can feel overwhelming. But with a little sticktoitiveness, and the right process, the journey can be a rewarding one.

Seven Steps to Writing Your Family History Book

Step #1: Getting the Family Involved:

One of the biggest challenges you will likely face will come at the very beginning of the process.

Hesitant family members or an older generation afraid of sharing family secrets can be a stumbling block, which often prevents people from going any further.

Carol Cooke Darrow, a Certified Genealogist in Denver Colorado, has personally written three separate family histories.

She also leads a monthly class teaching others how to do the same.

She suggests using photos as an ice-breaker. Direct questions may seem intrusive.

Showing someone a photo opens up the possibility for them to tell the story of who is in the picture, why they are there, what happened that day, and so on.

Step #2. Collecting Living Memories

Personally talk to or interview as many people as possible.

No amount of research can ever produce the rich detail of an actual remembered story.

While it is not always possible to interview someone in person, or even over the phone, letters and email can be extremely useful.

It is important to develop a set of written interview questions before you begin.

This will give your research a road map, and yet allow for the answers to go in an organic direction.

It will also give continuity to your narrative, as that begins to develop.

You can use this same set of questions whether conducting an interview in-person, by telephone, or even email.

Hollace Ava Weiner, of the Fort Worth Jewish Archives, suggests limiting the attendees at an interview.

She learned when writing her own family history that too many people in an interview can be a distraction, and lead to interruptions. “We wrote down questions. We assigned one person to ask the questions.”

You may even find it necessary to bring in a 3rd party to conduct the interviews.

People are sometimes more willing to share when other family members are not around.

Written transcripts, audio files, records, photos, and almost anything else can be attached to your final project.

If you plan to publish a traditional bound book, you will need to convert all of these to visual images that will become a page in the book.

If you envision something more like a scrap-book, you can attach these items directly to the finished product.

Family members who may be unwilling to give you an interview or share personal stories, may share photos, mementos, or other documents.

Assuring them that you will return originals, if they desire, will go a long way toward helping you in your cause.

Excellent quality prints and copies are now easy to get and steps can be taken to preserve the originals.

Step #3. Understanding and Choosing a Writing Format

There are many styles or formats to choose from when writing your family history book.

From the very technical formats used by historians to the more casual and eclectic scrapbook, you will need to decide what form your final project will take.

For historic archivists, the two most commonly used forms are the Register (sometimes called Descendancy) and the Ahnentafel.

The Register style essentially begins in the past and moves forward in time to the present.

The Ahnentafel begins in the present and moves backward, incorporating a specific numbering and charting system for tracking family units.

But unless you plan to submit your family history book to a national archive, you may want to take a more modern approach.

A memoir or family biography may be the right choice for you.

One method is to trace a surname back as far as you can, then write a chronological biographical narrative leading to the present day.

In this case you would place your ancestors within the context of history, writing their stories both remembered and presumed.

You will end up with something like a novel all about your family—the politics, economics, and circumstances that led to movement, migration, and settlement.

Another option is to compile records, stories, memories, interviews, charts, etc. scrapbook style in a bound book.

This approach is no less time consuming, but may be more suited for those wanting to combine multiple branches of the family tree into one book.

These also make lovely anniversary/engagement/graduation gifts.

Which style you choose depends on the narrative you wish to tell and the book you wish to produce.

Step #4. Conducting Family History Research

Some people have been conducting research for many years, and are just now thinking of compiling all of the information into a readable, preservable book.

Others have recently become interested in their family history and want to publish a book in time for a family reunion next year.

Wherever you are in your journey, and whatever your timeline, there are online tools available to help.

The internet makes research much quicker and easier than it ever has been in the past.

Access to microfiche, birth and death certificates, marriage licenses and divorce decrees, wills, census and military records, immigration and naturalization records, ship passenger lists, land records and even newspaper articles are all at your fingertips.

Free and paid sites such as these will be invaluable in your search.

  • GED match
  • International Society of Genetic Genealogy
  • Google
  • Mooseroots
  • Cyndy’s List
  • The National Archives

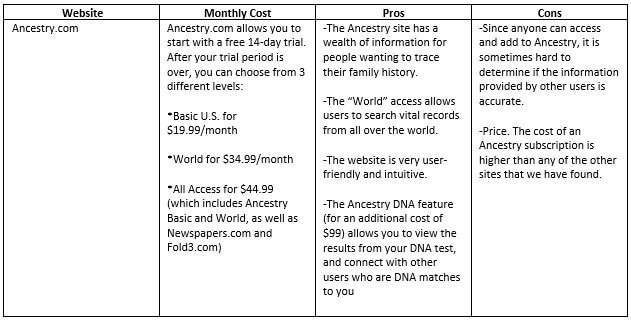
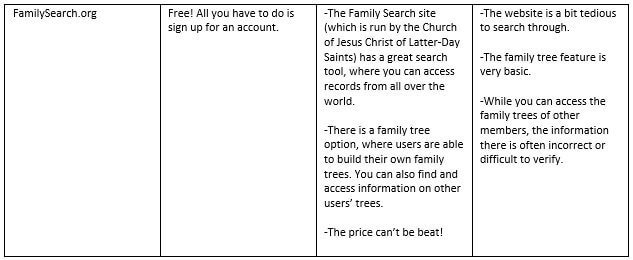
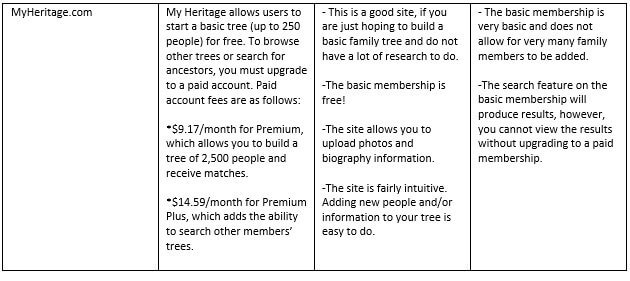
TWFH genealogist, Jennifer Rizzo, gives us her review of some of the best of these sites. She breaks them down by cost, pros, and cons in this great article.

Step #5. Document Collection

A good rule of thumb: If you cite it, you should include it.

Zoe von Ende Lappin, a member of WISE Family History Society in Denver, Colorado who has written and published a comprehensive family history entitled The Savages of County Louth and America, recommends that you “Identify unproven material, such as family stories, as such. But document those that you can verify.”

Think about the final product and how meaningful it will be if the records you were able to find were included in the bound book.

Many times you can request copies of documents through the site where you found them or download the records directly from the web.

Possible items to include are:

  • The genealogy chart or family tree you create
  • Maps showing movement and migration
  • Census and military records
  • Photographs
  • Letters
  • Marriage licenses
  • Divorce decrees
  • Land deeds
  • Wills
  • Newspaper clippings
  • Written, audio, or video transcripts of family interviews
  • Images of family heirlooms, such as a watch or wedding rings

Step #6. Writing Your Story

Now it is time to start writing.

There are many online tools for writing, charting, and organizing everything that you have collected.

Back Up My Tree, Evernote, and WordPress are all excellent! But a simple word-processing software such as Word or Pages is also sufficient.

The most important thing is that you put it down in writing.

It is also important to think about your audience.

Who is going to read this?

If writing a memoir, write in first person, otherwise a third-person narrative is the best approach.

Story-telling is the way history has always been passed down.

As you are collecting stories, you may discover a recurring theme.

You might notice that a large number of your ancestors followed a similar profession.

You may see that most of them were members of the same societies or fraternal organizations.

Following a theme is a good way to give your research direction, and begin to formulate a narrative.

Consider your audience as you begin to define the project.

No one wants to read every detail of every descendant you have ever had leading back to The Garden.

Choosing a specific theme that interests you, or one specific couple whose lineage you want to follow, will give you the framework for a story people want to read, and that you want to write.

One commonly used theme is to write about the members of a family who lived in one specific geographic location. The Smiths of Texas County, is an example.

Or you may choose something more unusual such as a family history of recipes.

Much can be learned about a family through the food they eat.

You could write stories about the women, where they lived, how they found local ingredients, the economic challenges they faced, and the children they bore.

Carol Cooke Darrow suggests that “starting small, choosing something you want to preserve, and giving yourself a deadline” are all keys finishing the project.

Step #7. Publishing Your Story

You got the family involved, you collected the living memories, you chose a format, you conducted extensive research, collected all the documents, and wrote your story.

Now it is time to publish your hard work.

For many projects, Amazon’s CreateSpace is a high quality, low cost option.

With online tools accessible 24 hours a day, 7 days a week, and no up-front fees, they are an easy safe zone in the self-publishing market.

There are limitations with what you can do creatively. But, if you are looking for straight-forward templates and quick publishing turn-around, CreateSpace has everything you need.

For a more robust project, or one where you have more creative control, you may need to look to a smaller publishing house.

Stellar Communications, for example, has a team of professional editors, writers, graphic artists, photographers, illustrators, and more who can help you with your custom job.

Other self-publishing sites such as Lulu, Otter Bay, Geology House, Stories to Tell Books, and Legacy Books are all online and offer different features.

Pro Tip- Including Photos and Visuals

A picture is worth a thousand words, and at no time is that more true than in a family history.

If you have been able to collect photos and other visual history, you will no doubt want to include those in your final book.

Make yourself aware of any copyright laws regarding your materials, and always remember to give credit where credit is due by documenting where you found the image.

After scanning the originals, Dropbox, cloud storage, and even thumb drives can be helpful as images can take up significant amounts of space on your hard drive.

For storing original photos and other delicate items, our expert Jennifer Rizzo recommends a good-old fashioned cedar chest.

Just make sure to place them in a polyester sleeve or acid free paper box first, and store the chest away from direct heat or moisture.

Writing down your family history is a gift to yourself, your relatives, and to generations yet to come.

Whether for an anniversary gift, a submission to a national historic archive, or simply a compilation of many years’ worth of personal research, it is a project worth perusing.

Recognizing the scope of the project, setting an achievable deadline, and following these steps will help you achieve the goal of a beautiful, polished, and sharable finished product.

Diving Headfirst Into Your Family Tree

Do you ever wonder about where your ancestors came from, and what struggles they had to endure in their life’s voyage?

The journey of discovering your roots and your family history can be quite fascinating and exciting.

It can also be a daunting and time-consuming task.

A simple Google search will lead you to a vast array of websites, promising to give you the answers to the ever-popular question, “where did I come from?”

But how do you know which websites are actually worth your time (and money)? And once you are on those websites, how can you be sure that the information you are finding is accurate?

How do you know if the history you find is really YOUR family history?

Here is a list of some of the most popular genealogy web sites and our reviews on which make the grade, and which fail to deliver.

Classes

One important thing to keep in mind when diving into your family history research is that there is a definite learning curve. It takes time (and experience) to figure out how and where to locate the information you are seeking.

If you have endless time to dedicate to this task, then learning by trial and error may be the right method for you.

If not, you might want to consider checking out an online class or two, to help you learn the tricks of the trade.

While there are thousands of options out there, here are a few free ones that are a great starting point:

  • YouTube

    Type “genealogy for beginners,” and you will get THOUSANDS of videos with tips on how to start your ancestry research.
  • Family Search Learning Center

    Signing up for a free account on this website will give you access to hundreds of great webinars; many of catered to specific areas of research (Military Records, Colonial Immigration, etc.).
  • Ancestry.com

    Sign up for an ancestry account, you will have access to their instructional videos, which help you learn how to navigate their site and make the most out of your membership.
  • Brigham Young University Independent Study

    Using Adobe Flash Player, the website offers a variety of free online genealogy courses.

Magazines

If ancestry is more than just a passing curiosity for you, a subscription to a genealogy magazine can be a very helpful tool.

Many of these magazines provide insight into different methods of genealogical research, updates on public releases of records, and other valuable information.

Just as there are hundreds of different genealogy websites out there, you will find that there are a large variety of magazines that focus on genealogy and ancestry.

The best magazine for you will really depend on your specific needs, but here are a few that are worth checking out:

  • Family Tree Magazine

    Geared towards more amateur genealogists, this is probably the most well known genealogical magazines out there. It is a fun magazine, full of great personal stories, tips for taking family research trips, and interesting tidbits about different ethnic backgrounds and heritages.
  • National Genealogical Society Quarterly

    This one is a must-have for serious genealogists. The magazine, provided to members of the National Genealogical Society, is chock-full of valuable information, research tips, and up-to-date genealogical news. And, as an added benefit to joining the National Genealogical Society, you will also get access to the plethora of online classes offered by the society.
  • Your Genealogy Today

    Whether you are a novice or a seasoned genealogist, this magazine has something for everyone. The bi-monthly magazine covers everything from DNA research to genealogy tourism.

Hiring a Genealogist

Now, if you are like much of the population and don’t have enough time to invest in really digging deep into your family history, hiring a professional genealogist may be something you’ll want to consider.

Aside from just the time constraints, hiring a professional comes with many other benefits:

  • Experience

    A professional genealogist has experience weeding through thousands of documents and records and is more likely to be able to trace your exact line.
  • Knowledge

    A professional already knows where to find marriage records, locate ship manifestos, and search for military draft cards.
  • Skill

    Most professional genealogists are also very skilled at complex research (which is a necessity, when researching ancestry).
  • Organization

    Sorting through the records of thousands of ancestors takes some serious organizational skills. A professional genealogist knows how to make sense of all that information and compile it in to easy-to-follow reports and diagrams.

Regardless of how you decide to tackle the exciting task of unearthing your family’s history, you are in for a fun ride.

A ride full of fascinating discoveries, beautiful stories, and a new appreciation for how you came to be.

Copywriter Q&A: Jennifer Rizzo Shares Tips for Genealogy Research

Jennifer Rizzo has always been fascinated by genealogy. At The Writers For Hire (TWFH), she puts this lifelong interest to use, helping clients fill out branches in their family trees and answer big, important questions about who they are and where they came from. 

In this installment of Copywriter Q&A, Jennifer shares some of her suggestions for aspiring genealogists and anyone interested in taking a deep dive in to their family history. Here’s a hint: It takes patience, time, and some outside-the-box research skills.

TWFH: You’ve been our resident genealogy expert for years now. How did you start learning about genealogy research?

JR: I’ve always been fascinated by genealogy. When I was a little girl, my grandparents would tell me about where my family came from. My 2nd great-grandma came from Germany; she was part of a royal family and she was born in a castle in Cologne. She fell in love with a commoner and she wanted to marry him. Her family gave her an ultimatum: she could leave him and remain part of royal family, or she could marry him and be disowned and excommunicated from church. She chose him. Her family made it impossible for him to get work, so they emigrated to America and eventually settled in Colorado. Our family still lives here.

TWFH: That’s an amazing story! No wonder you were fascinated by your family’s history.

JR: It really has been a lifelong interest. When I was 19, I went on a backpacking trip to Europe, and I went to Cologne, and got in touch with some of my relatives that were still living there. Some speak a little English, some not at all. I was thousands of miles from home, but meeting them gave me a sense of identity that I’ve never felt before, and it cemented my love of genealogy and family history. It made me want to learn more about other branches of family history, explore where the rest of family came from. So, that’s when I started taking classes and learning about genealogical research.

TWFH: Genealogy can be overwhelming for the inexperienced. Do you have any tips for people who are just starting to research their family history?

JR: The first step is to figure out where you’re going to keep all of the information you find. There are so many pieces, and you need to keep them in a centralized place. Find a site that allows you to build a family tree. Ancestry.com is my personal favorite, but there are a lot out there. Start by plugging in whatever you already know: Your name, your parents’ and grandparents’ names and birthdates. Put that in, and you’ll see where there are gaps of missing information. Then, ask family members. It’s amazing what you can find out by asking the right questions.

TWFH: What are the “right” questions to ask? How can you get family members talking?

JR: A lot of times, the best thing to ask is for family stories. A lot of facts are tied into stories. Your relative might not think they know a lot about family history. But try asking when their parents came to this country or what challenges they faced. Then, listen for little clues. That’s the best way to get started.

TWFH: What are your favorite resources for genealogy research?

JR: The Mormon church now has a large portion of their expansive archives available in an online database. They’ve always kept immaculate records, but originally, you’d have to go to a Mormon church or family center and physically search for information. Now it’s all online. Their website is called Familysearch.org. It’s not as user-friendly as Ancestry.com, but you can sign up for free membership. You can do research, and they do have a place where you can build family tree. It’s a good place to keep organized and it’s free. It’s a really good database to look through.

TWFH: You mentioned that Familysearch is free, but a lot of genealogy sites require a paid membership. In your opinion, are paid memberships worth it?

JR: Yes, I think if you’re beginning your research, they are worth it. Give yourself a month’s worth of paid memberships and plow through as much information as you can. But you want to be choosy about which memberships you pay for; some are not worth it. Obviously, Ancestry is one I’d recommend because it’s very intuitive and it has a lot of information.

TWFH: Are there any surprising places to find information? Anything that most people might not think of right away?

JR: Try looking through old census records, state or federal. They have a lot of valuable information. Ship manifests are good, too, if you know when your ancestors came to this country. A ship manifest will tell a person’s name, age, occupation, and where they came from. You have to be careful with these types of sources, though: They’re notorious for having misspellings of names or wrong birth years. These records were handwritten at a time when people didn’t always have a set spelling for their names. Things were just spelled phonetically by whoever was doing the writing. Also, when records were transcribed, the names were recorded in whatever way they were understood by the person recording them. So, if the person who originally wrote the record had horrible handwriting, the recorded name might be very different from the actual name.

TWFH: That has to make things more difficult. Does that change how you approach research? How do you make sure you’re finding the right people? 

JR: Just keep those things in mind and watch for other clues. Recently, I was doing research for a client and I was trying to find information about their family from the 1870 Census. I knew what area they were living in at the time, and I knew first names of the family members. I went page by page and found a family that had all of the correct dates of birth, ages, and first names — but the person who recorded it put in a wacky last name so when I did a search, the family’s name didn’t come up. That’s why you should make sure you’re looking for other clues in addition to the last name. And it’s not always clerical errors: Some families, depending on when they immigrated to America, may have changed their last name to assimilate. There are also a lot of cultures where people have multiple first and last names; in some cases, their names ended up being shortened.

TWFH: So how do you find out what other names might be used? Where are some other places to look for clues?

JR: Some people have old family bibles, and they use those to record when anyone is born or is baptized or gets married or dies. You can also try checking ship manifests: If you know name of the ship, you can Google it. Or, you can use the Mormon genealogy site or and Ancestry site, there’s a place where you can search for ship manifests or immigration.  Another great resource is birth certificates, baptismal records, or death certificates. Those things frequently record a person’s full name.

TWFH: What’s the most interesting genealogy project you’ve worked on?

JR: That’s tough. Each of them has surprised and amazed me in some way; I’ve unraveled family mysteries and discovered family origins that were previously completely unknown. One of the most interesting projects took me to the UK and Germany to learn about the client’s ancestors, and the troubles they had to overcome during their lifetimes. Walking the streets where they lived hundreds of years ago was amazing; incredible. And spending hours upon hours in the National Archives, sorting through handwritten documents that are hundreds of years old, was surreal.

TWFH: What are some common challenges with genealogy? Are there any common roadblocks that can hinder research?  

JR: Research takes a lot of time and patience. Frequently, you are looking for a needle in a haystack. You have to spend time going page by page, looking for facts, discerning facts from other clutter out there. The one negative to sites like Ancestry.com is that anyone can put information in there, so you need to be able to determine if this is the ancestor you’re looking for. That’s really time-consuming, and people get frustrated. There can also be a huge challenge with language barriers. For example, if your ancestors are from Germany, chances are, the records are going to be in handwritten in Old German Gothic. And another challenge is that some records are not available online, and some simply don’t exist anymore. For example, in England, a lot of records were destroyed during the British civil war.

Land Titles and Deeds from 1856- Handwritten in Old German Gothic

TWFH: Is there any way to know ahead of time if the records you want actually exist?

JR: It helps to have a sense of the history where your ancestors came from. Depending on where they’re from, the records might have been kept in a state archive center or a church — is that church still there? Does that archive center still exist? What city did they live in? Does that city even exist anymore? Does that country even exist? Knowing these things can help point you in the right direction.

TWFH: What are some cool ways you can use your genealogy research? (Like, creating a family tree, a book, etc.) Have you seen anything especially cool?

JR: Most frequently, people are making family trees to pass down from generation to generation. They make diagrams to insert in books. One of the coolest things I’ve seen is one of our clients wrote a book about his own personal history and parts of his family history, starting with the earliest generation we found. He told their life story, with each chapter focusing on one generation.

TWFH: Genealogy research often results in lots of pieces of information from several sources. Do you have any tips for keeping information organized and accessible?

JR: This is old-school, but my favorite method is to keep a master folder on my computer desktop for each client. Within each folder I have sub-folder for each branch of tree. And then I have another sub-folder for each generation. Then, when I have a piece of new information, I can put it right in the folder. I scan things if I have a physical paper. When I visited the state archives in Germany, I ended up taking pictures with my phone and converting them to PDF, which was really helpful. Also, having a good file naming system is really important. If you stick with that, when you’re looking for a certain file later, it’s easy to find.

TWFH: In your opinion, what are the essential tools for genealogy research?

JR: Hokey as it sounds, patience, a good memory, and good research skills. Genealogical research is like searching for tiny pieces to a giant puzzle; you have to be able to remember clues and figure out how to put them together. You have to think outside of the box and look for answers in unlikely places.

How Google Followed Me Through My Travels For Genealogy Research

I have been very fortunate in the past few years to have had several writing projects that have allowed me to travel.

From doing genealogy research in Scotland, England, and Germany to doing interviews in Mexico for a nonfiction ghostwriting project, my passport has gotten quite a lot of use.

One side effect that I have discovered from working in so many different countries, though, is that my Google search engine frequently seems to be a bit confused.

For several months after I returned from my trip to Germany last summer, Google wanted to translate all of my search results into German. And even now, months after returning from Mexico, I occasionally get random Spanish results.

I figured that this had to do with some weird setting on my computer, or a need to go in and delete my cookies or cache. As it turns out, though, neither of those things were likely causing this issue.

Apparently, the answer may lie in Google’s location settings. Yes, it turns out that Google has been tracking my every move and following me all over the world.

As paranoid as that may sound, it is a fact. And it’s a fact that few people seem to realize.

As this great article from CNBC explains, if you use Google maps or other Google apps, Google stores a record of everywhere you go. And it goes beyond just recording the country or town that you are in.

Following instructions from the article, I decided to check it out for myself. First, I went into my location history, where I was immediately able to see a map that pinpointed all of the places I have been in the last couple of years.

Next, I clicked on the timeline feature and randomly put in a date and year. And just like magic, a list of everywhere I went that day came up.  The list included everything from restaurants I went to, trains I took, and miles that I walked. I was even able to see a map of my route and pictures that I took throughout the day.

Now, I personally think that this feature is pretty cool. After all, it’s fun to look back on all of the travels I’ve done and the incredible places I have seen.

However, if the fact that Google is tracking your every move makes you feel a bit uneasy, you don’t have to worry. There IS a way to turn off the tracking features. Just follow the instructions in the CNBC article, to learn how to both turn off the tracking feature and delete your location history.