Preparing to Write Your Family History Book: How to Draft an Outline and Organize Your Research
May 13, 2019
If you are like many people tackling the project of writing your family history book, you probably have a mountain of old paper documents, photos, and information you printed from online sources. Does this sound familiar?
You know the hard copy of the family tree on your mother’s side is around somewhere, but it might be buried beneath the notes you took while interviewing your uncle. Or, maybe it ended up in the pile of legal documents, among old property deeds and immigration materials.
Perhaps the most daunting part of documenting your family history is organizing your research. With a combination of paper and digital materials, it’s easy to misplace or misfile something, leaving a hole in your writing.
Lynn Palermo, who shares her own story of writing her family’s history on her blog, The Armchair Genealogist, gives this advice to beginners in a how-to post:
“If I had to start again, I would create an organization system from the start and be consistent.”
Lynn Palermo, Armchair Genealogist
What Type of Book Are You Writing?
Whether you are creating a memoir, biography, scrapbook or some other work, the time invested in creating an organization system is invaluable. Spending time getting organized on the front end can save much more time and a great deal of frustration later.
The process can be overwhelming. No matter how you plan to document your family history, there are two crucial components to the process: a solid outline and a good organizational system for your research.
Before you begin to draft an outline, you need to define the scope of your book. Who and what are you writing about? Is it one specific ancestor or an entire branch of the family? Does it cover a specific event or period of time, or is it a general overview of all the research you can find?
Once you answer those questions, you are ready to begin organizing the framework of your book.
Creating an Outline
There is no perfect formula for outlining the information in your book. This is a personal decision, based on how you want to present your findings and what makes the most logical sense to your story. Some common ways to divide up the information are by:
- Date/Period of Time
- Family Branch
- Geographical Area
For example, if your book encompasses everything you can find on all of your ancestors, then organizing the book by date may be a good plan. It becomes a chronological story with different ancestors discussed within the larger framework of a timeline.
Or, you could organize the book based on different branches of your family. The major sections of your outline would include each of the family groups, with descendants’ information and stories underneath.
If your lineage includes people from multiple regions of the world, then you might consider dividing your outline by geographical area. Each chapter could represent a different area of origin, with stories of specific ancestors told within.
Go Beyond Names and Dates
Once you have the larger framework established, it’s time to integrate your research and notes in a way that truly tells the story of your family. What interesting information did you find that surprised you? Which topics are most important to you? You may have found similar themes, like common occupations or military involvement, among many of your relatives.
Be Flexible
Your outline should be the backbone of the book, but don’t be afraid to move things around if research leads you in a new direction. Let your findings lead the process, and revise the outline until you have the information organized in the best possible way.
How to Organize Your Notes and Research
Researching your family history can have a snowball effect. One finding leads to another, which leads to another, and before you know it there are random bits of information scattered across a number of topics and people.

“We are so excited for the hunt of our ancestors, we don’t take the time to save our discoveries adequately in the beginning. By the time we realize we need a sound organization system, we are knee deep in genealogy stuff.”
Lynn Palermo, The Armchair Genealogist
The goal is to take all of your information and plug the substantive material into the outline you created. A good place to start is simply reviewing your research to see what works within the outline. Here are some things to consider including in your book:
- Family papers, correspondence, etc.
- Property deeds
- Wills
- Immigration documents
- Existing family trees
- Diaries
- Photos
- Interviews
Tip: Don’t forget to keep detailed source citations. Decide on a citation method and be consistent across all sources, as you go.
A common pitfall among first-timers is to throw everything into one big pile (or one computer folder) and figure you will divide it up later. Let’s be honest…you probably won’t, and it will be a challenge to locate what you need to plug into your outline.
“File your documents as you find them. That catch-all folder, whether it’s for paper or digital, it is just an excuse to put off what you should be doing immediately, keeping your research in an organized fashion.”
Lynn Palermo, The Armchair Genealogist
Create Digital Files
Palermo encourages compiling your notes into word documents. Create one computer folder for each family group, with sub-folders for individual family members.
Tip: Regularly back up your computer to protect your notes.
What goes in the sub-folders?
A good place to start is to create an overview document for each person. In that document, include a simple form so you can consistently collect basic information like names and dates. This is also the document for more substantive material, like transcribed interviews or notes you jotted down from online research. When you uncover new information, you can easily enter it into the overview document, knowing it will be parallel to the material you have on other family members.
For example, you might create an overview document with sections like these:
- Name
- Birth/Death dates
- Place of birth
- Parents
- Children
- Occupation
- Notes/Interesting Information
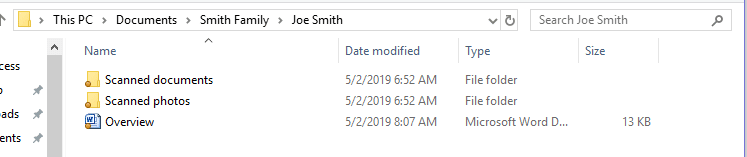
In addition to the overview document, each person’s subfolder should also include any scanned documents and photos you find. Here’s an example of what this folder structure might look like on your computer:
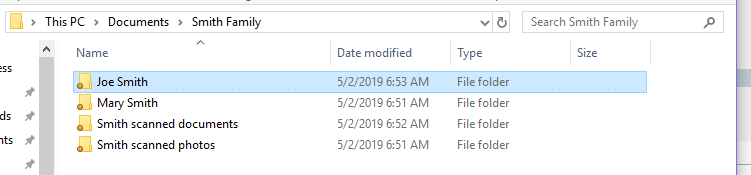
Next, create separate subfolders for pictures and other scanned documents that apply to the entire family, rather than just one family member. These subfolders logically fit within the larger family folder.
Here’s an example of how this might look on your computer:
Consider Electronic Organization Platforms
If you want a more sophisticated way to keep up with your research and cross-reference data, look into cloud-based storage systems. Lots of options exist with capabilities like uploading audio and video files, scanned documents, and photos taken with your smartphone.
These platforms also have tagging functions so you can easily sort through materials to find and group things in a way that makes sense for your outline. And, because your information is stored in the cloud, you can access materials from any device, anywhere.
Check out these platforms:
In an article for Family Tree Magazine, writer Lisa Louise Cooke recommends using Evernote’s free Web Clipper function to manage large online resources. The Web Clipper allows you to save a specific page or section within a website. You can easily save a full web page, even if it is larger than your computer screen and not visible all at once.
Create Research Binders
While it’s a good idea to scan hard copies to keep in your digital files, you still need a place to keep the original documents. Consider using three-ring binders to house your hard-copy documents.
These should mirror the digital files, with one binder for each family group. Divide individual family members into separate sections, with tabs, and include pockets for scanned photos and other documents.

Ready, Set, Write!
Your outline is complete, and your notes are soundly organized. Are you ready to start writing? Getting to this point has taken considerable time and effort and may have seemed like the hardest part of the project. But, if you’re not comfortable with the actual writing process, you still have a large hurdle to clear.
Consider hiring a ghostwriter. You can hand over your digital and hard-copy files to an experienced writer who can turn your notes into something truly memorable. Professionals can help define and narrow your focus and also expand on your research and interviews to tell your family story for generations to come.


I am in the process of attempting to capture my family history and need help with what questions to ask family members as I seek their inputs. Do you have questions or a template I can use or websites I can visit for guidance?
Hi Lisa,
Thank you for your inquiry! If you check out this blog on family history interviews, you will find that it has a lot of great interview tips, as well as a PDF with suggested questions. https://www.thewritersforhire.com/your-guide-to-the-family-history-interview/
Good luck with your family history! Please let us know if we can be of service to you in any way.
TWFH